
Third Person Camera System
- Sep 10, 2016
- 4 min read

This Blueprint has been made to get an active camera system and made for any type of projects, e.g: Zombies, Adventure, Action, etc... You can totally customize it by changing the camera positions and the transition times just by modifying the variables' values.
I recommend you to read and follow all the tutorial
step by step.
Note: Th: means Theory. I'm explaining you how, why or when things are in a certain way or what it can cause. It will be most of the time in brackets.
Im: Means Important. I'm telling you what's really important. If you don't read or follow the instructions noted, you might experience some troubles with the camera.
For this operation, you can choose to Migrate all the project (Th: If you already have the starter content and/or the AnimStarterPack in your project, it will erase it and replace with this one.) or you can simply copy the files that you want from the explorer.
In just 10 steps, and 20 minutes you'll have a new Camera System, which can be used in different situations, such as Survival games, online MMOTPS, or even games where the character can drive different types of vehicles.
1- If you have any camera system pre-made, I recommend you to remove it, or it will or can cause a malfunction of the actual blueprint.
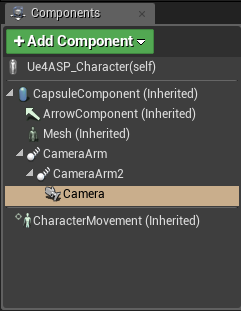
2- Set the position of the camera and the spring arms.
You should have 2 Spring Arms and 1 camera, ordered as this example:

You can add as many parents as you want, as long as CameraArm>CameraArm2>Camera.
Set the sprint arm and the camera as shown below for more realism in your project.

Th: The 2 Spring Arms system allows to avoid the camera from colliding with the world when she is close or away. So you should always set the short SpringArm's EndPoint where the camera will be close and the long SpringArm's EndPoint where the camera will be away. I tried many ways to do that but this is the most effective. Look at the pictures for a better understanding.
Example of positions:
CameraArm Location: X=0 Y=0 Z=0
CameraArm2 Location: X=250 Y=0 Z=-30
CameraArm Length : 250
CameraArm2 Length : 100
Camera Location : X=0 Y=50 Z=0
Camera Away:

Camera Close:

Th: Here you can see that the spring arm are not straight. It's because I set their socket offset to 30.

Im: Here, you NEED to set the CameraArm's Collision test OFF and the CameraArm2's Collision test ON.
CameraArm2

CameraArm

This will avoid the camera from being blocked by CameraArm (Camera Away) while you use CameraArm2 (Camera Close)
3- Copy the blueprints from the file blueprint in the content browser (Th: If you choose to do not migrate the project)
4- In camera function Replace BP_Main_Character by your character and CameraArm by your Spring Arm (The longest)

5- Copy the magenta part of UE4ASP_Character and put it in your character blueprint.

Don't forget to copy Constructive Script too, otherwise the system won't work as expected.

(Th: If your project crash when you copy-paste the blueprint, you can copy the character file (.uasset) from the content browser, put it in your project and you’ll be able to copy-paste without problem.)
5.5- connect event begin to your event begin and event tick to your event tick and event destroyed to your event destroyed (Th: If you already had these events in your blueprint, the engine will transform the new ones in custom events. That's why we replace them)
6- If you already have a respawn event, replace the copied one by your's and connect it to begin play. (Th: If your character doesn't respawn you don't need to add it. It depends on how your character works. If he respawns you can try with and without the respawn event connected to even begin. This is why the respawn bubble is Green)

7- Create the variables (To create box )

COMPILE AND SAVE
8-

If this kind of problem happens, you can simply create these inputs in EDIT< PROJECT SETTINGS < ENGINE < INPUT.
Or you can simply replace them by your custom input.
9- Capsule component or mesh as camera's parent
Im: DO NOT pass this step. and read ALL of it.
Here you have the choice, between choosing the capsule component as parent or the mesh. In case you choose the mesh, everything is fine, but you have some modification to do.

But if you choose the Capsule component, we can't let it this way, because when you'll crouch your character, something annoying will happen.
Thirst, you need to go to the crouch bubble, and open the collapsed graph "Camera in mesh or in capsule"

Once opened, you just have to set the variable as True if your camera parent is the capsule component and False if not. (Left False as default)
I already made all the sooo boring and sooo complicated part.

10- REPLACE:
I used to do it a certain way, but it wasn't efficient and took a lot of time. I made a new way how to replace all the variables.
First you'll have to go to Event Tick and find this graph

Then you need to go inside and you'll find this graph:
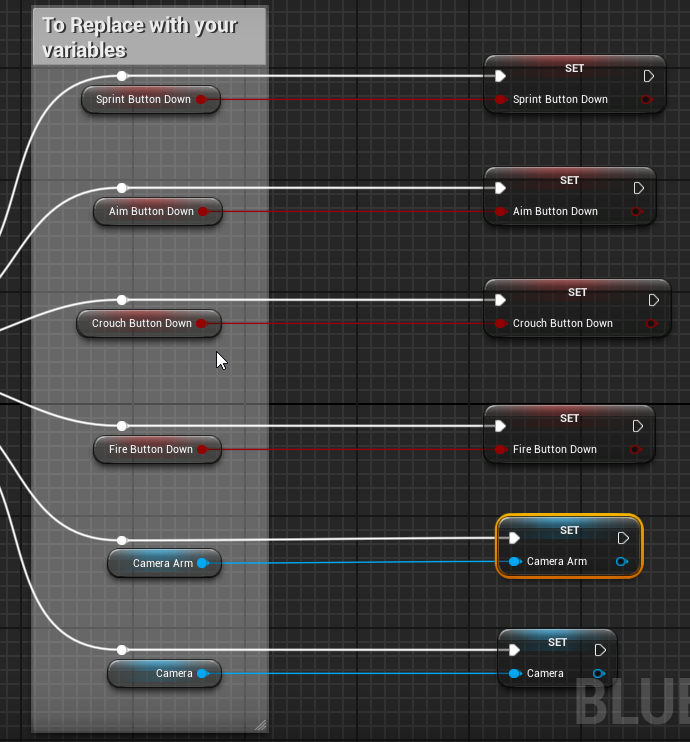
Then you'll just have to replace all the variables in the bubble by your own variables.
Th: This needs to be done every tick, so the variables type "boolean" can be updated every time they change (because they'll change a lot while you'll be playing!)
This is how it should look like (the variables in the comment box changed):

11-
Now COMPILE AND SAVE again and it should be good to go.
You made a camera system in less than 20 minutes!
You should check this post to have more information and tips about how works this blueprint and how to use it properly


Comments